 |

|
|
YUMI from PenDriveLinux.com is a Windows and Linux
utility program which enables a USB flash drive to easily boot into multiple Linux and other utility software collections.
In order to simplify the process (and save a lot of time), we will only use YUMI to create the basic YUMI boot/menu structure
(SYSLINUX/GRUB) for multibooting. This requires starting YUMI, selecting the correct USB drive letter, clicking on the FORMAT box,
and selecting a "fake" dummy ISO file (empty.iso) needed to create that basic structure. We then uncompress KUDOS64.exe to add
all "real" content to your newly created USB YUMI Multiboot flash drive. KUDOS64.exe contains two of the best small,
fast and elegant 2014 64-bit Linux distributions plus the most useful utility and rescue software.
The Gooplusplus Multiboot 2014 "KUDOS" 64-bit collection fits on a 4GB or larger USB flash drive. To add USB persistence
file(s) for saving user settings and data, an 8GB or 16GB USB stick is required. LXLE, Netrunner and OpenElec XBMC are 64-bit
Linux distros. They should run on most PCs built in the last ten years. A small 64MB "persistence" file has been added to the
designed-for-USB Porteus Linux distro. You can also add USB persistence to LXLE and possibly to Netrunner since
both are based on Ubuntu.
We also created a companion 4GB Gooplusplus Multiboot
2014 "KUDOS" 32-bit collection. If wanted, add these other 32-bit distros to your USB flash drive by simply running
KUDOS32.exe and selecting your USB drive's home directory (example: H:\ ). Then, go to your USB drive directory and run
the set-32bit-active.bat command. KUDOS32.exe will safely merge with existing KUDOS64 files to create a
combined 8GB KUDOS 32+64 bit USB "jumbo" collection. Visit our guide to Goo++ USB multiboot collections.
For safety, before starting installation, we recommend that you eject and remove all other USB hard drives and USB flash drives.
You should have arrived at this web document from a selection on the click-START.cmd or
click-START-WinXP menu.
 |
 |
(For those with SanDisk USB drives, run SANDISKFIX above first). To begin, start YUMI, select USB drive letter, click FORMAT box. Next, cursor down to bottom of distro list to Try Unlisted ISO (Grub), click BROWSE button and select "empty.iso". Next, click YUMI's CREATE button. You will not install any other distros at this time so you can exit YUMI and return to the click-START.cmd menu.
![]()
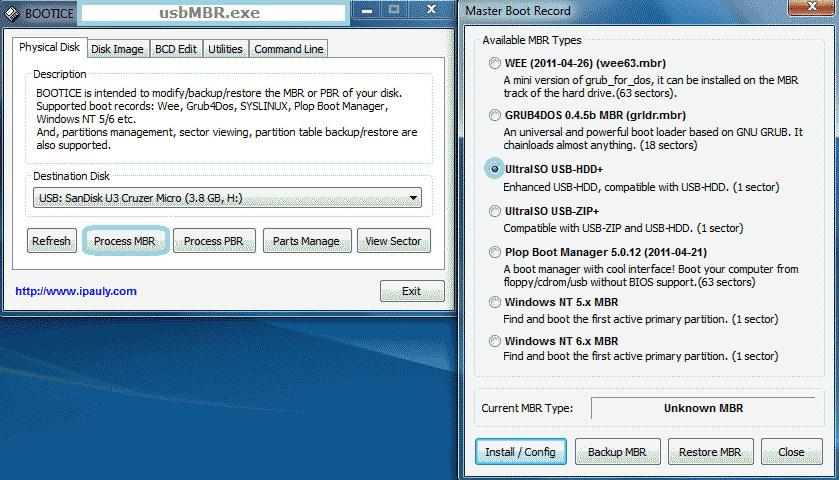
Next, we recommend (option) that you change the USB flash drive's MBR type to UltraISO. This will help ensure that the USB
flash drive is bootable on a wider variety of PC's and notebooks. The (BootICE) usbMBR utility does not affect files on
your USB drive.
| Download: | (1) KAT torrent search ( usb+multiboot+gooplusplus ) | (2) c|net or softpedia: USB MULTIBOOT (Kudos 64-bit) |
After SanDiskFIX (optional), YUMI "empty.ISO" and usbMBR actions, run KUDOS64.exe to transfer Linux and utility software to USB.
This 64-bit Linux collection may sometimes slightly improve performance compared to 32-bit when running some software, especially resource-intensive gaming. Unlike Windows, however, this performance edge is seldom noticeable in memory-efficient Linux. So, 32-bit distros are often preferred for greater compatibility with older PCs, lower memory use and for running in VMware or VirtualBox virtual machines. We also created a companion 4GB Gooplusplus Multiboot 2014 "KUDOS" 32-bit collection. You can mix and match 32-bit and 64-bit distros on most modern PCs, so you can run KUDOS32.exe to add the KUDOS32 distros to your KUDOS64 collection.
Based on Lubuntu, LXLE 14.04 is one of the most attractive lightweight Linux distros with a superior menu system and fully loaded with some great Linux software. LXLE uses the LXDE desktop environment and Openbox windows manager. For those who prefer the power and maturity of KDE, Netrunner 14 is an advanced spin on highly regarded Kubuntu 14.04.1. Porteus KDE is a surprisingly speedy designed-for-USB Slackware-based distro with an expandable 64MB USB persistence file. Porteus can also be installed (with a bit more effort) to hard disk. OpenElec XBMC is a media center distro described below.
Our custom rescue and utility Hiren's Boot CD "mini" contains a compressed micro version of WinXP plus many dozens of utility programs for Windows, DOS and Linux. We also added extra software and many unix commands. Even so, overall size was reduced to one third of the original Hiren's Boot CD by removing outdated and redundant antivirus and partition software and carefully removing utility programs that were less effective or problem prone. Our cross-platfrom Partition Wizard "minitool" (with partition recovery) has been added to this collection even though our three Linux main distros also include Gparted or KDE partition manager.
--- FINAL INSTALLATION NOTES ---
(1) For alternative Install from Linux without the Windows click-START.cmd script:
• Download Debian or Ubuntu version of YUMI.
• Run YUMI to format and create YUMI USB boot menu structure by installing the included fake "empty.iso"
• Rename KUDOS-64.exe to KUDOS-64.7z and extract distros and files to your USB drive.
(2) You can use 4GB, 8GB or larger USB flash drives. For larger USB flash drives, leave at least 1GB available for one (optional) Ubuntu-standard \casper-rw persistence file. You can create this file (256MB, 500MB, 1GB, or more) with the included PDL-RW tool for one Ubuntu-based distro, e.g., Ubuntu, Kubuntu, Lubuntu, Xubuntu, Zorin, Netrunner, Elementary, Peppermint, Mint KDE, Pinguy, Joli OS, Bodhi, etc. Edit one distro isolinux.cfg or txt.cfg file to enable persistence, replacing "noprompt" with the word "persistent".
(3) You can add and remove new Linux and utility distros with the YUMI program. DO NOT format your USB flash drive a second time (removing all of your USB Linux setup). You will be limited to distros from YUMI's list (or possibly rename a closely related distro). It is best to download and use the latest YUMI version in order to install newer Linux distros and utility software.
(4) Once you have installed your YUMI distros, you can reboot your PC. On most PCs, you can keep pressing the F12 key until you get a boot menu. Select your USB drive and then your custom YUMI menu should start up quickly.
(5) Why use YUMI instead of other Linux-based multiboot software? YUMI is well known and it works fairly predictably. We have briefly tried a few other multiboot systems but they seemed more difficult and less predictable. We also considered that there are many more Windows users than Linux users. To encourage Windows users to try Linux, we especialy tried to make

Send comments, suggestions, or questions to:
gooplusplus.248@gmail.com -- Bob Carroll, Las Vegas
OpenELEC's XBMC Media Center distro is unlike other Linux distributions in this collection. It is basically a "single program" distro. So, a little more detail about the XBMC program is warranted. OpenELEC has done a remarkable job incorporating XBMC in a truly tiny, efficient, and optimized Linux distribution. By default, we chose to include the "optimized for Intel GMA" graphics version of OpenELEC since this version should be compatible with PCs built with Intel CPUs for the past 10 years.
KUDOS-64 does not contain OpenElec's newer 2014 4.xx series XBMC distros. Unfortunately, OpenElec chose to make newer versions essentially incompatible with USB multibooting by requiring that USB "persistence" be from a separate EXT4 partition rather than from a more convenient and practical EXT4 file.
For PC's with AMD CPUs or those with non-Intel graphics chips, you can download two substitute files which best match your PC's graphics chip: (1) Nvidia ION (2) AMD Fusion (3) Generic 32-bit (4) Generic 64-bit. After extracting the appropriate OpenElec download archive to your hard disk, copy target\SYSTEM and target\KERNEL to your USB flash drive. Then move the KERNEL file to your USB YUMI drive's multiboot\openelec folder. You can find these alternate files at OpenElec XBMC Legacy builds.
We have disabled the "install to hard disk" function in the OpenELEC startup menu. This is based on a safety concern that inexperienced users may damage their existing PC Windows or Linux system. OpenELEC XBMC is typically installed as a standalone system HTPC. As part of a multiboot system, hard disk installation is rarely needed because an XBMC software "program" is readily available for Linux, Windows and Mac computers.
When OpenELEC XBMC starts for the first time, it will attempt to create a new 512MB \EXT4-64 SAVE file in your USB flash drive's main (root) directory. This will work on 8GB or larger USB flash drives but will fail on a 4GB USB flash drive (there is not enough space left). Depending on your PC, this SAVE file creation may be slow but the next time bootup will be much faster. Also on the first run, you will be prompted for setup information, your wifi account info and passphrase, etc. If you make a mistake or if there is a problem with this network information, you can make correction later at the System > OpenELEC menu selection.
After initial setup is finished you will see the XBMC horizontal bar menu. If you need to make changes to your network or wifi information, cursor over to SYSTEM > OpenELEC and click. Next, System > Open Connections and click. Next, Wireless Network. Enter your wifi SSID and select security type (usually WPA or WPA2). Next, enter your PASSPHRASE and click DONE. Once wifi is set up, right click on an empty area on the XBMC Desktop.
Next, set your time zone. Cursor to the SYSTEM > SETTINGS. Next click Appearance > International. Next, change Timezone Country by clicking up/down arrows to find your country (sorry, this can be a tedious process). Next, click the Timezone up/down arrows to find a city in your timezone.
Right-Click (R/C) is a common part of navigating XBMC. Typically R/C means "go back" or "escape" and sometimes R/C shows more menu choices. Volume control shortcut keys are + or = to increase or decrease volume. Your spacebar toggles pause/play.
Next, we need to select our preferred Video, Audio, and Program "Addons". This is a major part of XBMC. You get "Addons" from "XBMC repositories" including the OpenELEC repository and other optional 3rd party repositories. Ideally the XBMC and OpenELEC repositories are active immediately after set up. In practice, this is rarely true and you must first "Force Refresh".
Addons: SYSTEM > SETTINGS > Addons > Get Addons. Now, click OpenElec Addons, R/C and select Force Refresh. Wait 30 seconds or so before the next step. Next, XBMC.org Addons, R/C and select Force Refresh. Again wait 30 seconds before proceeding. Your default repositories should now be available.
Next, we will choose an Addon for testing: VIDEOS > Addons > Get more. Click Al Jazeera and Install. Wait a until Al Jazeera shows enabled. Next click Al Jazeera > Watch Live. If you see video playing, things seem to be working. Type x to stop the video and then click the HOME icon.
Now, let's add some 3rd party Addons from downloaded ZIP files you can find on the internet. One by one, you may want to install
these ZIP file Addons.
SYSTEM > SETTINGS > ADDONS > Install from ZIP file. We recommend a few for installation:
As with any large and complex program, getting the most out of XBMC Media Center will require some trial-and-error and experimentation, reviewing documentation, and participating on XBMC and OpenElec forums. XBMC allows you to view a huge number of streaming videos located all over the planet as well as from your local network and PC.
XBMC forums --- OpenELEC forums --- XBMC Wiki --- XBMC Settings --- OpenELEC Wiki --- OpenELEC Configuration